
2026-09-25
Planter Drainage and Irrigation Design: A Specifier's Guide for Public Landscapes
How to specify drainage layers, outlet details and irrigation for large outdoor planters in municipal plazas, streetscapes and rooftop landscapes — with a layer-by-layer build-up table.
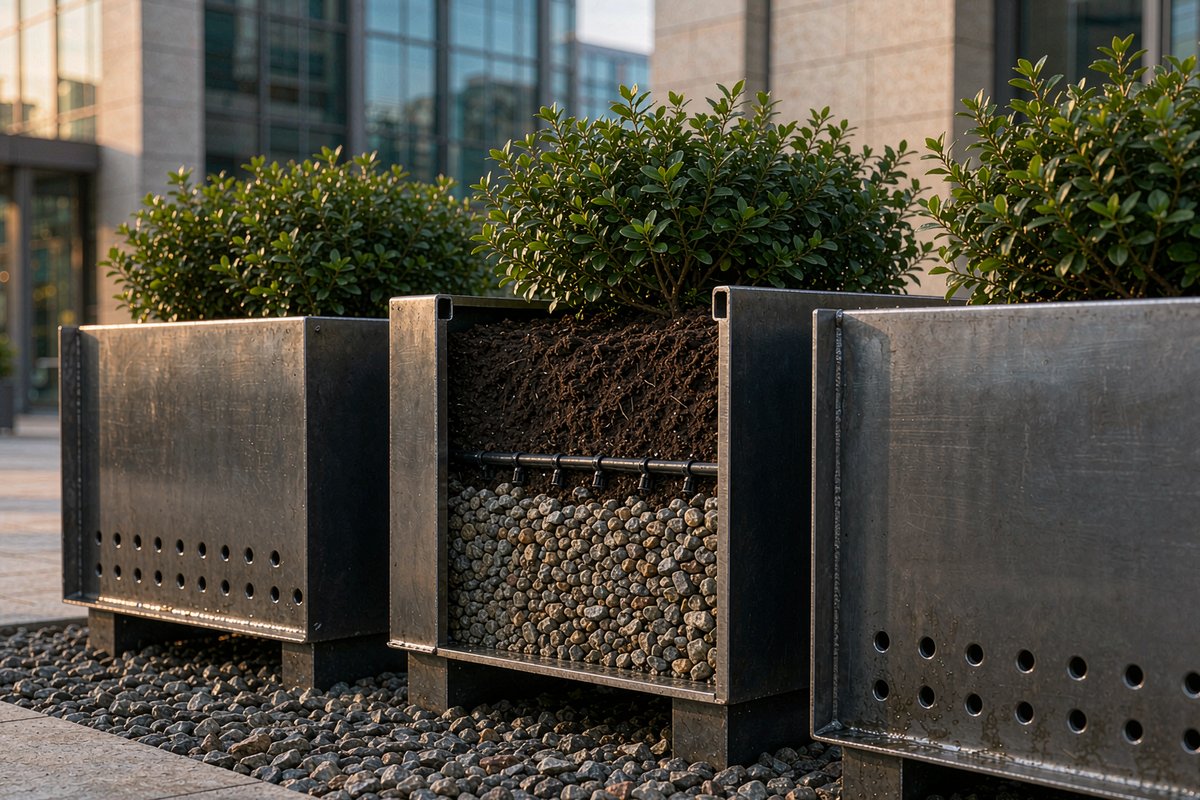
Planters are the only piece of site furniture that has to keep something alive. Benches can survive a bad specification with nothing worse than a scratched coating, but a planter with poor drainage kills its planting within a season, stains the paving beneath it, and turns a landscape feature into a recurring maintenance ticket. Most planter failures we see in public projects are not plant-selection problems — they are drainage and irrigation problems that were decided (or ignored) at the specification stage. This guide sets out the layer build-up, outlet details, irrigation options and winter considerations that municipal teams, landscape architects and contractors should lock down before ordering containers for plazas, streetscapes and rooftops.
Why Drainage Fails in Public Planters
Public conditions are harsher than private gardens in three specific ways:
- Volume and depth: large street planters are often 600–1,200 mm deep. Deep containers hold water at the bottom long after the surface looks dry, so crews water the top while the root zone quietly waterlogs.
- Impermeable surroundings: a planter sitting on paving or a roof deck cannot drain into the ground. Every liter of irrigation and rain must exit through the outlet detail — or sideways into the soil, or over the rim onto the pavement.
- Nobody is watching daily: parks crews visit weekly. There is no gardener to notice the first signs of root rot.
The consequence is predictable: anaerobic soil, yellowing foliage, plant replacement every spring, and efflorescence or rust streaks staining premium paving. All of it traces back to the build-up inside the box.
The Layer Build-Up That Works
A well-specified large planter is a small engineered profile from rim to outlet. Use this as a procurement checklist:
| Layer (top to bottom) | Typical thickness | Function | Common mistake |
|---|---|---|---|
| Mulch / gravel topping | 30–50 mm | Reduces evaporation, stops splash staining | Omitted, so soil washes onto paving |
| Growing medium | Per planting plan | Structural, free-draining urban substrate | Using garden topsoil, which compacts |
| Filter / geotextile fleece | 1 layer | Keeps soil out of the drainage layer | Omitted — drainage layer silts up within 2 years |
| Drainage layer | 50–150 mm | Expanded clay or gravel creates the air/water reservoir | Soil laid directly on the base |
| Root barrier (over membranes) | Where required | Protects roof waterproofing | Ignored on rooftop projects |
| Freeboard | 50–100 mm below rim | Captures rain without overflow | Filled to the brim, so every rain event overflows |
Two details matter as much as the layers themselves. First, never let the drainage layer touch the soil directly — the geotextile separator is what keeps the reservoir working for the life of the planter. Second, maintain real freeboard: a planter filled to the rim has no rain capacity and dumps dirty water onto the plaza at the first downpour.
Outlets, Feet and Paving Protection
The outlet is where drainage design meets the public realm:
- Drainage holes at 10–20 mm diameter, several across the base rather than one large hole — multiple small outlets resist blockage and clogging by roots.
- Elevate the planter on feet or a base rail, 20–50 mm off the paving. A planter sitting flat on stone traps a wet, dark zone underneath — the ideal environment for staining, freeze damage and corrosion on the underside coating.
- Direct water consciously. On roof decks, connect outlets to the deck drain with a spigot or hose tail. At street level, a thin gravel apron under the outlet prevents a permanent dark stain on light paving.
- Capillary break, not a plugged hole. Maintenance teams sometimes plug "leaking" outlets — that single act converts a working planter into a water tank. Brief the crew that some drip after watering is by design.
Irrigation Options Compared
Drainage and irrigation are two halves of the same water balance. Once the container drains properly, the question is how water gets in:
| Approach | Best for | Pros | Cons |
|---|---|---|---|
| Manual hose watering | Sites under ~20 planters, or with daily staff | Lowest capex, flexible | Labor-heavy, inconsistent, easy to forget in heat waves |
| Self-watering reservoir (wicking) | High-profile plazas, forgotten corners | 1–3 week intervals, dramatically fewer deaths | Higher unit cost; needs a fill point and overflow |
| Drip line from municipal supply | Streetscape rows, medians | Precise, programmable, low labor | Needs backflow protection, pressure regulation and winter drain-down |
| Smart / sensor-controlled zones | Large campuses, rooftop landscapes | Water savings of 30–50%, alerts on faults | Highest cost; requires commissioning and occasional sensor service |
For most municipal budgets the sweet spot is self-watering reservoirs for scattered feature planters and drip irrigation for continuous runs. If drip is specified, insist on a flush point at line ends and a winterization procedure — a drip system that is not drained before the first freeze splits its fittings and leaks invisibly inside the planter body all winter.
Planting Depth and Container Sizing
Drainage only works if the container matches the planting:
- Grasses and seasonal color: 300–450 mm depth
- Shrubs: 500–750 mm
- Small trees: 800–1,200 mm with structural substrate and deliberate root ball anchoring
Undersized containers dry out in hours during summer and leave no room for the drainage layer to do its job — which is why the depth figures above must include the 100–200 mm consumed by drainage and freeboard, not just root space.
Winter and Anti-Vandal Considerations
In freeze-thaw climates, saturated soil is the enemy of both plants and containers: water expands roughly 9% on freezing, and that pressure finds the weakest weld and coating. Specify free-draining build-up, raised feet, and — for steel containers — continuous seam welding with a fully encapsulated coating system. Drainage holes should also serve as winter drain-down points. Vandal-resistant details (welded rims, no loose trims, tamper-resistant fixings for any attachable irrigation fittings) keep the hydraulic design intact over years of public use.
Sourcing Planters Built for Real Drainage
For procurement teams buying at municipal scale, drainage quality is ultimately a fabrication question: hole placement, feet height, weld continuity and coating coverage on the underside are all factory-controlled details that cannot be fixed on site. AOTUDE, a factory-direct outdoor planter and site furniture manufacturer based in Foshan, China, fabricates steel and corten planters with engineered drainage layouts, integrated feet, optional self-watering reservoirs and drip pass-throughs, plus OEM/ODM customization from 50 pcs per SKU, any RAL powder-coat color, and 5–10 year structural warranties backed in writing. Drawings with outlet positions and reservoir details are provided for approval before production; see the full range at https://aotude.com.
Bottom line: specify the build-up table, protect the outlet detail, match irrigation to your maintenance reality, and buy containers whose fabrication supports the hydraulics. Do that and the planters will look after the landscape — instead of the other way around.